Here’s a bit of what I’ve been up to lately…


Here’s a bit of what I’ve been up to lately…
I’ve shared from time to time on the blog about opportunities that come my way. Sometimes they come into fruition and sometimes they don’t…and sometimes they take FOREVER! I’ve been working with Shutterfly for months on a few projects and was so excited to see my photos all over their baby announcement page on the website…yeah!
Here’s the splash page: (my photo is the baby girl in the middle)

Here are a few of the individual card designs.


Here’s the link to check out more: Shutterfly Baby Announcements
Do you have organization on the brain like I do? January is a fresh start, and the closets would like a fresh start too! Not to mention the kids toys, the pantry, the laundry room and the list goes on. One of my favorite places to go when I’m feeling the itch to purge and re-organize is The Container Store. It’s like Target on crack! The options are beyond what you can even imagine. So, I thought I’d show you a few things that I love from this store and a few things that are on my wish list.

(1) So, I love the colored storage boxes with labels. I’ve printed labels out so they stay uniform and looking nice. The kids always know where to put their toys and things. I got mine at Ikea, but they look really similar.
(2) This is on my wish list. I love the poppy colors. I’m thinking I would use these flatter boxes to store artwork and projects that come home from school. I hate clutter like no one’s business.
(3) Another wish list item…storage has to functional, but you don’t want your home to look like a 1st grade classroom. I love the nautical inspiration here and I would totally use this to put all our blankets.
(4) Simple natural fiber baskets. I feel like I have a million of these, but there’s never enough. They look nice on shelves and fit all the ugly stuff like wii remotes and movie cases.
(5) A hands down favorite. My laundry room is filled with these. It’s hard to see, but these plastic baskets have handles on the front. I’ve organized all my supplies, like bathroom cleaning, floor cleaning/dusting, laundry cleaning, etc. So each ‘theme’ has it’s own basket…making it quick to grab it from the shelf and take it to the area that needs cleaning without having to go back for things I forgot.
(6) Big ol’ plastic stackables. I like these for my kids’ shoes. They each have one and they can toss them in and no one ever has to look for matching shoes. Oh and I have one for the backpacks too. All hidden away inside the closet!
I consider myself lucky to be friends with him. He’s the kind of guy that inspires you to make whatever he’s serving, just because you want to eat it again and again! My friend Ben is a professional chef, but also whips up amazing stuff for friends too! When he offered to do a nacho bar for Jake’s party, I answered him before he even finished the question. After all the guests raved about the salsa, I begged him to write it down for me. He’s the kind of guy that throws in pinches and dollops and things just turn out good. But, in order to break it down for the novice, he wrote me the recipe.
Pre Heat Oven 500 degrees.
STEP 1
• 5 Pounds Roma Tomatoes cut in Half.
• 2 Medium Onions
• 8-10 Cloves of Garlic
• 1 Tablespoon Kosher Salt
• ½ teaspoon Fresh Ground Black Pepper
• 1 Tablespoon Dry Oregano
STEP 2
• 2 Tablespoons Apple Cider or Red Wine Vinegar
• *** Chipotle Peppers in Adobo Rinsed and Seeds Removed.
• 2 Tablespoons Canola or Vegetable Oil
STEP 3
• ¾ Bunch Fresh Cilantro
• 1 teaspoon Ground Cumin
• 1 Tablespoon Dry Oregano
• 1 Tablespoon (Adjust to taste based on your Taste Buds) Kosher Salt
• ½ teaspoon (Adjust to taste based on your Taste Buds) Fresh Ground
Black Pepper
Pre Heat your oven to 500 – 550 degrees for at least 10
minutes. Cut the Roma tomatoes in Half Lengthwise. Peel and Slice
the onions Crescent style about ¼ inch thick. Lay flat on the cut side
and the onions on the bottom and the garlic on top of that. Spray
with Vegetable oil and sprinkle with the dry ingredients. Roast for
15 Minutes Checking for even cooking. Rotate Pans and Roast for
15-25 more minutes until they look like the photo. A few darker
parts are good as they lend to the character of the Salsa. Cool
before step 2.
Step 2.
Blend thoroughly in batches to your preferred consistency
and put your batches is a stainless steel bowl.
Step 3.
Add remaining ingredients to your batch and stir in
thoroughly with a wire whip. Be sure to check the salt level after
waiting 3 minutes before adding more, as it takes time for the salt
to dissolve completely.
***2 for Mild – 3 for Medium – 4 for Medium-Hot – 5+ to impress your friends

I should note that I made this for New Years Day and I was anxious to get started, so I went shopping before I heard from him with the recipe. I was guessing the ingredients, so I didn’t have the chipotle peppers on hand. Instead I roasted a jalapeno and and it into the mix for heat.

He also gave me the recipe for his black bean chili and queso…but that share is for another day. Instead, I’ll show you the end result. Topped our chips with loads of salsa, sour cream, queso, olives, black bean chili and a little tri-tip. I’m getting hungry thinking about it!


Go try this salsa…and don’t be intimidated by the roasting. It was soooo easy and the flavors are spot on.

Oh and yeah, we use paper plates. That’s how we roll when we’re feelin’ lazy!
About 6 months ago, I photographed my good friend Laura’s baby Lincoln. I love working with her because she pushes me out of my comfort zone. And this time it would be getting a newborn to balance on a not-so-cuddly ottoman from West Elm. Oh yeah, and add in a toddler. We rocked it out and it was worth all the blood, sweat and tears!

Now that Lincoln is coming up on 6 months, it’s fun to see how he and Hudson interact together. Even from the start, Hudson was super into his little bro.


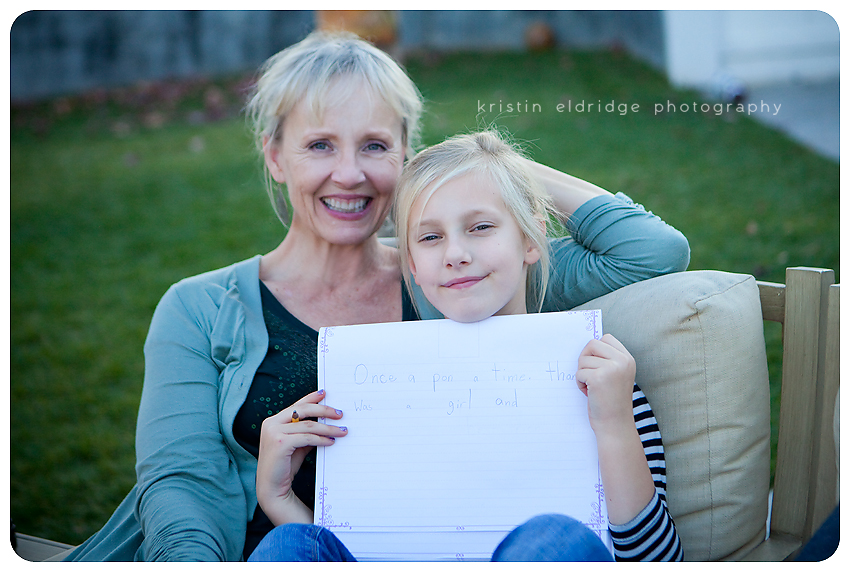
I made this video 2 years ago when I first bought my 5D mark ii. At the time Jillian was 5, Cooper 7 and Jake 9. The funniest thing is to see their teeth…Jillian with all her baby teeth and the boys with their big ole teeth growing in. Jake has already been through braces and Cooper is in the middle of it. Oh and their squeaky little voices…don’t you love video to bring you back to those little baby voices?
Anyway, I wanted to share our Christmas with you. I love to see all the excitement of the month of December culminate into one blur of fun on Christmas Day.


With Christmas being on a Sunday this year we had to be out the door by 9:30 for church. Of course Brent was speaking and Jillian and I worked in the 3 year old class. So, we were on a tight schedule for cinnamon rolls, egg casserole and opening presents!


I started taking pictures so early that there really wasn’t much natural light. My camera ISO was at 3200. I was makin’ her work!


I love the big surprise gifts and equally as much I love the heart-felt ones. Cooper shopped for Jillian at the school Christmas store and asked me to wrap her gift. It was the cutest thing ever!


Brent is such a thoughtful guy…he got me a few perfect gifts like the scarf I’m wearing in the photos and this new kitchen knife. I may look a little too excited about it. 🙂


Jillian is really into art and we got her an easel and some supplies. I love that she has taken such an interest. I can’t wait to see where it leads!


Sometimes I’m not able to get my big camera out quick enough to capture the moment, or maybe I’m just too lazy. But, I do take a lot of my iphone..and most get uploaded to instagram. Here’s a little highlight of some of the more mundane moments…food prep (prime rib, scalloped potatoes, proscuitto wrapped gorgonzola stuffed dates, homemade apple pie and vanilla custard ice cream) also Christmas eve AKA operation find all the hidden Christmas presents and the family starting to gather for dinner.


Lucky lucky us…the weather was nice enough to hang outside later in the day. Jillian the “hooly-hooper” entertained us…


I was in church today filled with excitement about the coming year…all the possibilities in front of us. It’s amazing how as you get older the years seem to flip like pages of a book. But, each January is a like a fresh start. A time to look back at your blessings and make the changes to live an even better life in the year ahead.
The other day I posted a picture of the gifts the kids gave their teachers for Christmas on Instagram and Facebook. I had a few requests for recipes and details, so I thought I’d share!
I picked up this ADORABLE Martha Stewart packaging at JoAnns when I was there buying supplies for Jake’s party. They always end up putting her stuff on sale as it gets closer to the holiday. And I loved the design on this one. Really cute details and inside the box each of the scalloped mini boxes came out and had printed paper for lining.


Inside the box was four mini-boxes, so I decided to make four different treats. The first is quite easy (well, actually most of them were easy!)…white chocolate dipped oreos. There’s no real recipe…just melt white chocolate chips in the microwave and add a little vegetable oil to make it smoother. I laid my cookies out on waxed paper and then dunked them into a bowl of the white chocolate so both sides were covered and let them dry. We sprinkled them with crushed candy cane before they dried. The kids enjoyed crushing the candy cane with my rolling pin!

I used a brownie mix (shh! don’t tell anyone it was a mix) and fancied it up with cheesecake swirls. Just make the brownie mix as directed and spread it in the pan. Then mix a softened 8 ounce block of cream cheese with an egg and 1/3 cup sugar. Put dollops around the brownie pan and then use a butter knife to swirl it. Then just bake as directed. Cheesecake brownies!!

Next up is the round shortbread cookies dipped in chocolate and candy cane. I love Barefoot Contessa’s shortbread recipe. Here’s the link to it: Shortbread Cookies
I used my biscuit cutter to make rounds, then after they were cooled I went through the same melting chocolate process and dipped just the ends of these cookies then sprinkled them with crushed candy cane.
Last is my mom’s toffee recipe. This is a holiday must-have at our house. And I’m warning you…it’s addictive. I’ve posted about it before on the blog with the recipe, so click here for the Toffee Recipe.

Okay now for the finale…the FUN! Here’s the birthday boy:

And it totally RAINED on our party. But, that didn’t stop people from having fun. And thankfully it didn’t last the whole party.


This lame mom forgot to pull one of the cupcakes I made for a candle and a birthday song and they were all gone! So, I quickly threw some ice cream dibs into a snow cone cup so Jake could blow out a candle and have a wish. 🙂


Making snow globes… We also had Ice Age playing for those that wanted to come inside. It was a great idea…especially for the littler party goers.

The pool was PACKED with kids! (And yes it looks like we lost the one in the pink bath suit…she’s just snorkeling 🙂

The other really really fun element of the party was the photo booth. We put out a white background and just grabbed the kids as they got out of the pool. I had a basket of hats and sunglasses to choose from and a bag of fake snow. I LOVE how they all came out. Kids are so much fun to photograph!!

My sweet friend Shelly took this one of our family!


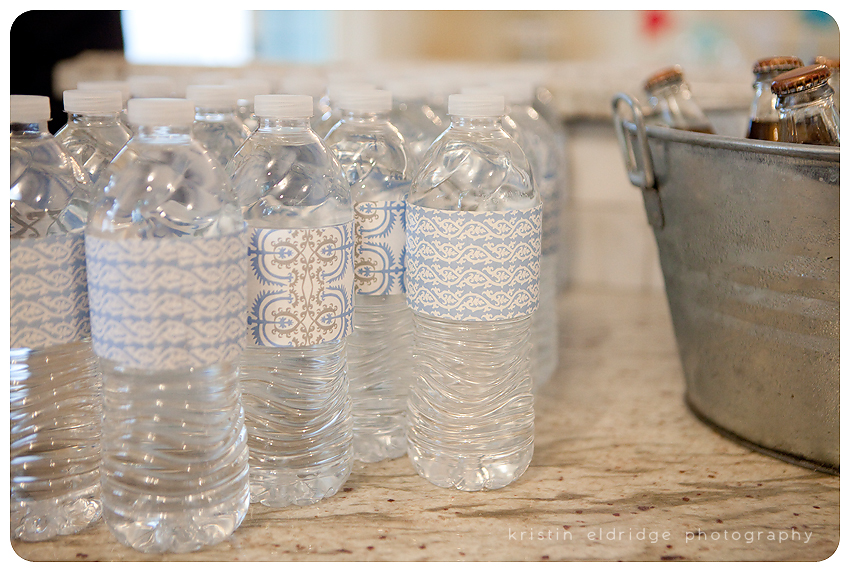
A few summers ago Brent plunged into icy water for a fundraiser…a polar-bearing event, per say. The kids were thrilled about the whole concept. So, much so that a few years later Jake insisted on having a pool party for his December birthday. We normally have smaller celebrations for the kids’ birthdays, but every once in a while, it’s fun to do a big bash. We went all out with Jake’s icy theme. Except when it came to the pool. It was so warm that even though it rained during the party, the pool was packed with swimmers!
I loved the details of Jake’s party, so I wanted to share that part with you first. I also did a photo booth and took a lot of pictures of the kids having fun, so that will come in the next post.

I bought some 36″ balloons and put some of my ribbon scraps to use. I made the mistake of renting a helium tank to save a little money. Trying to tie these guys off has left my fingers about 2 inches shorter than they used to be. Best to leave that job to the experts.

Okay…so another fun part was the food. Here’s the table display:

The pendants were from previous photo shoots, so it was nice that they matched with the theme.


I tried to go ‘homemade’ as much as possible, with the exception of these SNOWBALLS from Cost Plus World Market. They’re basically white cheeto puffs. Yum.


So a few notes about the food: I made hot dogs and my ‘team’ of helpful family wrapped them all in parchment paper and blue bakers twine. We served them with homemade chili and all the fixings. There were snowball shaped pb&j sammies for the kids. (cut with my round biscuit cutters) Of course the cheese puff snowballs and homemade popcorn added to the white theme. I made Amy Sedaris’ vanilla cupcakes with my own cream cheese frosting. I love minis…they look so cute with toppers. The toppers are Martha Stewart snowflake punches hot-glued to toothpicks. Instead of the traditional rice krispy treats, I let the ‘batter’ cool and little the scooped it into balls for my mini paper cups. I added a few other white sides like vanilla marshmallows and yogurt pretzels.
The snowmen were made by the kids (with our help) and given as favors at the end of the party. I found the idea on pinterest. You basically skewer marshmallows, then paint them with karo syrup then roll into sparkling sugar. Mini oreos and rolos make the hat, then we piped the rest of the details with frosting.

I’m in love with the vintage style sodas, so we had a big variety of those…along with waters. And I love the paper straws from Garnish! (that’s also where the paper snow cone cups are from)

I set up a snow globe table for the kids that were finished swimming. Another pinterest idea. It was a huge hit!


A few weeks ago I was up to my eyeballs in cute clothes and babies! I had a slew of newborns come through and photographed a few lines of clothing for Little Skye Children’s Boutique. How can a girl complain…I love my job!

Baby Coco came with her big sister all the way from NYC.


And here’s my crew of adorable little girls modeling for Little Skye (brands are Elaine et Lena and Room Seven Spring 2012)!


And my tiniest model…love her!


